
by Lauren Janas, PowerPoint PM
PowerPoint for Microsoft 365, PowerPoint 2019 (on the PC and on macOS), and PowerPoint for the web have Morph to help you make smooth animations, transitions, and object movements across the slides in your presentation.

This article describes advanced things you can do with Morph. To learn the basics of applying the Morph transition, be sure to read Using the Morph transition in PowerPoint.
Take control over which objects morph
Morph now gives you more control over which objects do and don't morph. Our custom naming scheme lets you match two objects on successive slides and force one to morph into the other.
The naming scheme is simply to begin an object name with !! (two exclamation points) and to assign the same custom name to the two objects. Use the Selection pane, as described in the next section, to change an object's name.
For example, you can put a circle named !!Shape1 on Slide 7 and a square named !!Shape1 on Slide 8. Then, by assigning a Morph transition to Slide 8, the circle will morph into the square in the transition from one slide to the next.
To rename objects by using the Selection Pane
-
(On Windows) On the Home tab, in the Editing group, click Select > Selection Pane.
(On macOS) On the Home tab, in the Arrange group, click Selection Pane.
-
Click a name in the list to select the object. Click it a second time to make the name editable.
The Selection Pane opens on the right side. It shows a list of all the objects on the current slide. Most default names consist of a descriptive word and a numeral, such as Title 1. -
Press Ctrl+A to select the entire name. Type !! followed by whatever else you want to include in the name, such as !!ShapeForMorph.
-
Press Enter to preserve the new name you've typed.
What you can do with this feature
-
Force different shapes (such as a circle and a square) to morph.
-
Force two instances of the same shape—but with different text in each— to morph.
-
Force two images to morph.
-
Force any two objects of the same type to morph (table/table, SmartArt/SmartArt). One exception is charts: they don't morph, they cross-fade.
-
Continue to use object names that don't start with !! and know that it won't change the way Morph treats them.
Rules Morph follows with the !! naming scheme
-
If Morph sees two objects of the same type with the same name, starting with !!, across two slides, it'll morph one object to the other in the transition from one slide to the next.
-
Morph won't match a "!!" object with a non-"!!" object.
-
Morph expects a 1:1 mapping between objects, so for best results, a specific !!Name should be unique on a slide.
Working with custom shapes
-
PowerPoint can't geometrically morph a shape that has more than one hole in it.
-
If the shape you're morphing has edit points on it:
-
The before and after shapes should have roughly the same number of edit points. Positionally, each point should roughly correspond to a counterpart on the other shape where you want it to morph to.
-
The shapes should be drawn with the same orientation (either clockwise or counterclockwise).
-
Versions of PowerPoint that support the !! naming scheme
|
Product |
Minimum version number that supports !! naming |
|---|---|
|
PowerPoint for Microsoft 365 for Windows, Current Channel |
1903 |
|
PowerPoint for Microsoft 365 for Windows, Semi-Annual Enterprise Channel |
1908 |
|
PowerPoint for Microsoft 365 for Mac |
16.23 |
|
PowerPoint 2019 for Windows |
1908 |
|
PowerPoint 2019 for Mac |
16.28 |
|
PowerPoint 2016 for Windows |
16.0.4888 (In this version, playing a Morph transition is supported in Slide Show, but creating a Morph transition in Normal view isn't supported.) |
|
PowerPoint for iOS |
2.24 (In this version, playing a Morph transition is supported in Slide Show, but creating a Morph transition in Normal view isn't supported.) |
|
PowerPoint Mobile |
1903 (In this version, playing a Morph transition is supported in Slide Show, but creating a Morph transition in Normal view isn't supported.) |
Use Morph to create the following kinds of effects and animations:
Select a heading below to open it and see the detailed instructions.
-
Create a slide with the object positioned in its starting state.
-
Duplicate the slide, or copy and paste the object you want to move or emphasize onto the next slide.
Do any of the following:
-
To create a Motion path animation, move the object on the second slide to the destination position you'd like it to end up in.
-
For a Rotation animation, select the object and use the Rotate handle to turn the object on the second slide to where you'd like to see it rotate to during the Morph transition.
-
To create a Zoom animation, resize the object on the second slide to make it grow or shrink into position.
-
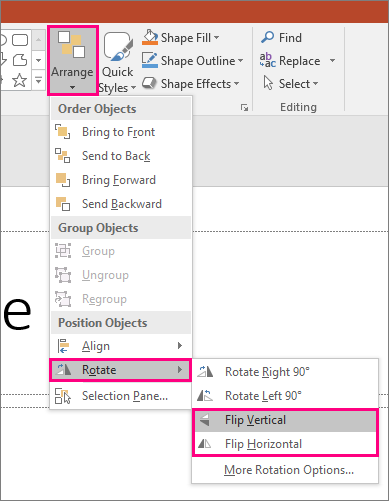
For a Flip animation, select the object on the second slide and go to Home > Arrange > Rotate > Flip horizontal or Flip vertical.
-
If you change color or formatting properties of the object on the second slide, Morph will animate the formatting changes in a smooth and seamless way when you transition between the first and second slide.
-
-
Select the second slide in the thumbnail pane and go to Transitions > Morph to apply the Morph transition, and then click Preview to see it in action.
Any of these effects can be used in combination—an object can be moved, resized, rotated, and have its color changed all at once. Just set up your starting and ending state on the first and second slides, apply the Morph transition to the second slide with the ending state, and Morph will do the rest.
-
Create a slide with the object positioned in its starting state.
-
Duplicate the slide, or copy and paste the object you want to move or emphasize onto the next slide.
Do any of the following:
-
Fade entrance animation: Add a new object to the second slide after you duplicate the slide.
-
Fade exit animation: Delete the object on the second slide to make it disappear during the transition.
-
Fly in animation: Move the object off the first slide (in the direction you'd like it to fly in from). You may need to Zoom in or out of a document, presentation, or worksheet to make room to drag your object off the slide.
-
Fly out animation: Move the object off the second slide entirely (in the direction you'd like it to fly out from). You may need to Zoom in or out of a document, presentation, or worksheet to make room to drag your object off the slide.
-
-
Select the second slide in the thumbnail pane and go to Transitions > Morph to apply the Morph transition, and then click Preview to see it in action.
-
Create a slide with the words you want to animate positioned in their starting state.
-
Duplicate the slide, or copy and paste the words you want to move or emphasize onto the next slide.
-
Move the words around to the state you'd like them to end up in—or change anything else, such as font style, size, or color—on the second slide and apply the Morph transition.
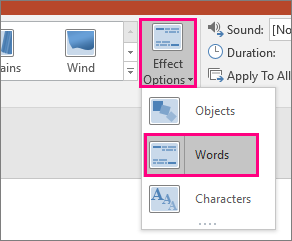
On the Transitions tab, set the Effect Option to Words. Depending on the effect you want to achieve, you can emphasize the addition, removal, motion, or appearance of a word from one slide to the next. Click Preview to see it in action.
Morph can rearrange individual characters on a slide to create an anagram effect in a word or phrase.
-
Create a slide with the characters you want to animate positioned in their starting state.
-
Duplicate the slide, or copy and paste the characters you want to move or emphasize onto the next slide.
-
Move the characters around to the state you'd like them to end up in on the second slide and apply the Morph transition.
On the Transitions tab, set the Effect Option to Characters, and click Preview to see it in action.

If you have an image that covers the whole background of your slide, you can create a zoom effect by making it bigger than the slide canvas.
-
Create a slide with the picture you want to zoom in on positioned as the background.
-
Duplicate the slide, or copy and paste the picture onto the next slide.
-
Drag the corners of the picture so that it extends beyond the slide canvas, as far out as you want to create the desired zoom effect.
-
Select the second slide in the thumbnail pane and go to Transitions > Morph to apply the Morph transition, and then click Preview to see it in action.
To create a scrolling effect, use a vertical image (such as a screen shot of a web page) taller than a normal landscape slide and show the top part of the image. Then, on the second slide, move the image up so the part you want to highlight is centered on the slide. Apply Morph to the second slide and watch the presentation appear to scroll to the relevant part of the image.
Morph can also be applied to bring motion to image cropping to easily emphasize part of an image.
-
Create a slide with an object and add an initial 3-D rotation by going to Drawing Tools > Shape Effects > 3D rotation.

-
Duplicate the slide and go to Drawing Tools > Shape Effects > 3-D rotation once again to create the 3-D rotation ending state.
-
Select the second slide in the thumbnail pane and go to Transitions > Morph to apply the Morph transition, and then click Preview to see it in action. You'll see the object animate in 3D from its starting position to its final position.


